Wednesday 31 October 2018

Simon Says Stamp - Wednesday Challenge Entry #2

Its Halloween here in New Zealand and we've already had two cute little 'Trick or Treater's' come in for some candy around 6pm. I was going to decorate the house this year but decided to put all my energy (and money) into my Christmas decorations instead.

However it doesn't mean I can't go 'Halloween crazy' with my cards instead, so have made a few this week. Thank goodness the theme for this weeks Simon Says Stamp - Wednesday Challenge is 'Halloween/Spooky'!!

So happy with how this card turned out. I've never created a 'moon' before and it looks so cool behind the black trees making it 'extra' Spooky...:


I think this 'Round Tree' die from The Cats Pajama's is one my favourite things I've purchased this year. Its perfect for Halloween and its going on a lot of my Christmas cards too.

I started by die-cutting the tree die from black CS. After working out where it would sit on the card front, I used a mini-blending tool and Distress Ink 'Mustard Seed' to make the moon. I then used 'Black Soot' to create the night sky around it. The tree die was glued over top and I used a white gel pen to add some dots for stars.

The ghosts and pumpkin (from The Cats Pajama's 'Faboolous') were stamped with Gina K Amalgam ink on Strathmore Bristol Smooth CS. I coloured them with Altenew Artist Markers, fussy cut out and glued on top of the die. I also used the white gel pen to brighten the eye highlights. I didn't have a TCP sentiment stamp that would fit on the card, so I heat embossed this one from MFT Stamps 'Witch way is the Candy?' on a strip of black CS and popped on foam tape, along with some black half-pearls.

I'm also going to link this to The Cats Pajama's Challenge #351 where their theme is 'Holiday'. This is my 'millionth' entry so they will be glad this challenge is about to close....


Its nearly 9pm and I'm already ready for bed!! Was great to be out gardening today but I can't believe how quickly the weeds are growing. All this rain and sunshine is causing mammoth growth of EVERYTHING so I definitely have plenty to keep me going until Christmas. Will be looking forward to my once-a-year holiday of two weeks over Christmas by the time it comes around that's for sure!!

Take care
Shona
 

CAS-ual Fridays Stamps October New Release - Day 3

Hello there, so glad your back for Day 3 of the CAS-ual Fridays Stamps New Release!!


Hope your enjoying seeing all the New Release projects so far this week and there are plenty more to come!! Today we are showing you a die set for one of the Christmas sets released last year. I'm extremely happy because this is one fiddly image to fussy cut around!!

Introducing the 'Mistletoe Fri-dies': 


The Mistletoe die fits so perfectly over the stamp image and cuts spaces in-between the branches too, which looks fantastic. And having a bow die couldn't be more handy, especially at this time of year!! Here's what I did with the die:


I got a bit 'die-cutting crazy' with this one but I do love die-cutting and its a wonder my Cuttlebug is still working!

Firstly I used a 'Bubble Box Fri-die' on some red CS and adhered to the card front for the background. I then used the 'To-Go Cup Fri-die' with some black and white CS, glued the lid on top and then popped it up on foam tape.

I stamped the mistletoe from the 'Mistletoe and Holly' stamp set with Versafine black ink on Strathmore Bristol Smooth CS and heat embossed with clear powder. I then used red and green Zig Real Color Brush Markers to colour it in. Once it was dry I used the new matching die and adhered it to the coffee cup.

The sentiment (also from the 'Mistletoe and Holly' stamp set) was heat embossed in gold, fussy cut out and put on foam tape, along with some sequins from Neat and Tangled. I also added some Glossy Accents to the red berries for a bit more shine.


Our town in much too small for a Starbucks but I can imagine they would have Christmas themed 'to-go' cups, so why not add some mistletoe!! I hope this gives you a few ideas for your own coffee cups or holiday projects. All of the New Release products are available to purchase right now, so if your going shopping don't forget to use my special code to save yourself some money!!


Don't forget to pop over to the CFS Blog to see the gorgeous projects the other Girl Fridays have made with these new dies. Thanks so much for stopping by and I'll see you back here tomorrow with some new Christmas and Hanukkah dies, along with lots of colour!!

Take care
Shona 
 

Tuesday 30 October 2018

Simon Says Stamp - Wednesday Challenge

Well, its the day before Halloween today here in New Zealand and I've spent the day at home with a sick Max and lots of rain. So while binge watching a new show on Netflix I thought I better make some more Halloween cards before this month ends!!

 
The theme for the current Simon Says Stamp - Wednesday Challenge is 'Spooky/Halloween' and since I already had some images coloured and fussy cut out, all I had to do was create a scary scene:


This all looks innocent enough until.........:


The reason I purchased this 'Faboolous' stamp set from The Cats Pajama's was for the little chainsaw image. I thought it was genius for a Halloween card and could be put in the hands of any innocent stamp image....although this one doesn't look quite so innocent....

I started off by stamping the little doll and chainsaw image on Strathmore Bristol Smooth CS, colouring with Altenew Artist Markers and fussy cutting out. I also heat embossed the 'Boo' from MFT Stamps 'Witch way to the Candy?' and the front sentiment from Paper Smooches 'Bitty Bungalows' in white on black CS and die-cut them with circle dies from Couture Creations.

I then die-cut the 'Fancy Door Frame' from Mama Elephant but only used the door part. I worked out where it would sit on my card front and blended some Distress Ink 'Black Soot' to create the darkness.... I glued the doorframe in place, as well as the doll and the sentiments. And that was it!!

I'm also going to link this to The Cats Pajama's Challenge #351 where their theme is 'Holiday'.


And will also link to the Stamplorations October CAS Card Challenge where their theme is:

 
Its 10pm here so definitely time for bed. Not sure if Max will be going back to school tomorrow but my Mum can come and look after him if need be. Monday was a holiday and missing today means I only have a 3-day week, so need to fit in as much weeding as I can. Its supposed to rain again on Thursday so cross fingers for me it passes us by....

We also had our biggest earthquake this afternoon for months. I could actually hear it coming and Max and I huddled in his bedroom door frame. Luckily there was no damage and no-one hurt but boy oh boy was it scary!!

Take care
Shona


CAS-ual Fridays Stamps October New Release - Day 2

Hello there and so glad you came back for Day 2 of the CAS-ual Fridays Stamps New Release week!!


Today we have a new stamp and die set to share with you. And the best part is that all the New Release products are available to purchase right now!!!

Introducing the Dashing Stamp Set  and Snow Fri-dies:


These have the most beautiful swirly font and perfect for all those upcoming Christmas cards for people who are lucky enough to have a 'White Christmas'!! Here's what I created with them:


I'm a sucker for non-traditional colours on my Christmas cards and love lots of white too. Our Christmas is right in the middle of a very-hot Summer in New Zealand so this is about as close as I can get to a 'White Christmas'!!

To start off I cut a panel of Strathmore Bristol Smooth CS and heat embossed the snowflakes from the new stamp set in clear. I then used a big round brush with some water and Zig Real Color Brush markers to create an ombre pink effect. Once this had dried I die-cut it with a Tag Buddies Fri-die. This was popped up on a piece of white foam on the card front.

I die-cut the new 'Snow' die 3x from white CS, glued them all together and then to the card front. I then gave it a good covering of Glossy Accents. I heat embossed the rest of the sentiment from the new stamp set in silver on white CS, fussy cut it out and adhered to the tag, along with some sequins from Neat and Tangled. I also added a bow of silver twine to the tag.

 I hope this gives you some ideas for your Christmas cards and if your off to do some CAS-ual Fridays Stamps  shopping, don't forget to use my special code to save yourself 15% on your purchase. Any saving is good especially at this time of year!!


Thanks so much for coming by. Pop over to the CFS Blog to see what the rest of the Girl Fridays have created with the new products. And I will see you back here tomorrow with some new fri-dies!!

Take care
Shona
 

Monday 29 October 2018

CAS-ual Fridays Stamps - October New Release - Day 1

Hi everybody and welcome to our latest New Release at CAS-ual Fridays Stamps!!


We have so many amazing stamps and dies to share with you this week, with lots of inspiration on how to use them all too. And the exciting thing is all the products are available to purchase right now!!!! Today we have a new die to share that can be used for so many types of cards.

Introducing the Big Hope Fri-die: 

 
This is the perfect size to be centre-stage on your card and the font is thick enough so you can layer it with ease. Here's what I created with it:


I had so much fun creating this one. I hadn't done any 'ink smooshing' for a while and just felt the need to get a bit out of control with my colouring!!

To start off I cut a panel of light grey CS and adhered to the card front. I then cut a panel of Strathmore Bristol Smooth CS and heat embossed the small ribbon from the 'Word Ribbon' stamp set in white all over it. 

Then using some Distress Inks in a variety of pinks/corals, I added them to a stamp block, sprayed with water and smooshed over the panel. I kept adding and drying (with a heat gun) and repeating the process until I was happy with the result. I then used a 'Bubble Box Fri-die' to die-cut it out and put it on a piece of white foam.

I die-cut the 'Big Hope Fri-die' from pink CS 3x and glued them all together, before gluing to the card front. I then stamped the sentiment from the 'Word Ribbon' stamp set with Hero Arts 'Bubblegum' Shadow Ink on white CS, fussy cut it out and glued to the card along with some sequins from Neat and Tangled. I also added lashings of Glossy Accents to the 'Big Hope' die.


If you haven't been there already, pop over to the CAS-ual Fridays Stamps Blog to see what the rest of the Girl Fridays have done with this die. And if your planning on shopping for any of the New Release products, don't forget to use my special code to save yourself some money!!


Thanks so much for stopping by and I'll see you back here tomorrow with some more New Release goodness!!

Take care
Shona
 

Saturday 27 October 2018

Simon Says Stamp Flickr Challenge #109 - Guest Designer!!

Well, talk about exciting!! I got an incredible invitation a few weeks ago to be a GD for the Simon Says Stamps Flickr Challenge  from Barb Engler and nearly fell off my chair!! The theme is all about 'Stencils' and even though I don't actually own any SSS stencils, I of course said yes straight away!!

I created three cards for the challenge and have lots of photos, so grab a cup of coffee and lots of chocolate biscuits and get comfy for a long blog post....


This is my first card, a Walrus cutie and these are the different dies I used.

I started off by die-cutting the SSS 'Border Waves' dies from clear acetate:


I've kept these with my other stencils so I can use them again in the future!!

I cut a panel of white CS and using Distress Oxide inks in different shades of blue, I blended across each stencil, alternating as I went down. I then trimmed the panel and turned it upside down so it looked like waves and popped it up on a piece of white foam. 

The SSS 'Picture Book Walrus' was die-cut from two-tones of grey, white and black CS. I glued them together on a piece of white CS and cut around it. I decided not to die-cut the tiny eye pieces and just used Nuvo Crystal Drops in Ebony Black to make some dots, which left some white showing through from behind. I then popped the walrus on some foam tape.

The sentiment (from SSS 'Beautiful Day') was stamped with Versafine black ink and heat embossed twice with clear powder on white CS. I lightly blended some of the blue inks around the edge, glued it to some black CS and put it on foam tape, along with some sequins from Neat and Tangled.


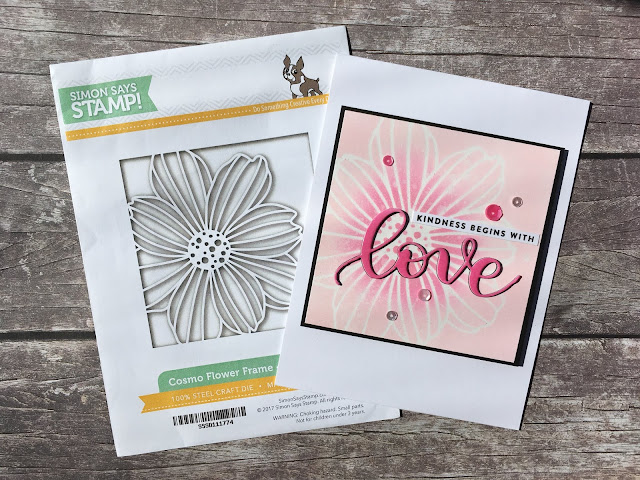
For my second card I die-cut the SSS 'Cosmo Flower Frame' die from the middle of a big piece of white CS. I put it over a piece of Strathmore Bristol Smooth CS and started off by blending Distress Oxide ink 'Spun Sugar' all over. I then went back in with 'Picked Raspberry' and then directly in the middle used 'Worn Lipstick'. I trimmed it down slightly, glued it to some black CS and then put up on black foam on the card front.

I blended some of the 'Picked Raspberry' Distress Oxide on a piece of white CS and then die-cut the SSS 'Love' die from it, along with two more from white CS. I glued them all together and then to the card. To give it some shine I covered it with Glossy Accents. To finish the sentiment I stamped it from SSS 'Kind Flowers' in black ink on a strip of white CS and glued to the card, along with some sequins from Neat and Tangled.


For my third and final card I created a stencil with the SSS 'Kindness Matters' die:


I die-cut it from white CS and then adhered to a piece of plain white paper, with glue only on the outside edge of the die-cut. I used a pair of scissors to cut away the paper from behind the words so that I could stop any over-flow ink from going on the card. Using Distress Oxide ink 'Tumbled Glass' I randomly blended the words over the card front. And I can keep it and use it again!!

I die-cut the die again 3x from white CS and also from a piece of white CS that had been coloured with 'Tumbled Glass' Distress Oxide ink. I glued all the die's together and then to the card front. Then came the time-consuming adding of all the white letters with the blue ones on top. 

To finish off I heat embossed a sentiment (from SSS 'Kind Flowers') in WOW! Embossing Powder 'Pastel Glacier Mint' and put it on foam tape, along with some sequins from Neat and Tangled.

Whew, if you made it this far well done! And if you made it this far with any chocolate biscuits left over can I have them???  This was so much fun to do and a great way to stretch the use of my dies too. Good old 'kiwi-ingenuity' they call it here in New Zealand.

Thank you so much for stopping by and I hope you get a chance to join the challenge too, can't wait to see what you do with your SSS stencil stash!

Take care
Shona
 

Saturday 20 October 2018

Collaboration Blog Hop with CAS-ual Fridays Stamps and Coffee Loving Cardmakers

Well, what a fabulous day it is and what a wonderful day to be blog hopping!! I'm so excited to be a part of today's blog hop with the Design Teams from Coffee Loving Cardmakers and CAS-ual Fridays Stamps!!


There is going to be coffee and tea loving projects all over the place, with so much inspiration and ideas to be had. I suggest making your favourite cup of tea or coffee, grabbing a few biscuits (alright, maybe the whole packet) and getting comfortable while you wander through blogland.

There is also the chance to win 1 of 3 $25 gift certificates to CAS-ual Fridays Stamps up for grabs from all comments left on the blogs. So the more comments you leave, the more chances you have of winning!!

For my card I'm still in 'Halloween' mode and there was one sentiment I had never used that would be perfect for a bit of blood splatter:


This was a lot of fun to make and I must have looked hilarious sitting here holding the die-cut cup, trying to work out where the finger prints would go!!

I started off by die-cutting the To Go Cup Fri-die 3x from white CS and gluing them all together for a bit of stability. I also did the same with the lid from black CS and glued it on top.

To create the blood I smeared some Altenew 'Crimson' ink on a clear block and added a bit of water. After working out where my fingers would sit if this was a real cup of coffee (although now looking at it I didn't include my little finger, must have been having a 'royal' moment) I used a brush to put the ink on my fingers and thumb and pressed on to the cup. I then used the brush to add some blood splatters and a few smears for good measure!! 

Using my MISTI I stamped the sentiment from 'Coffee Talk' on the card front with black ink and popped the cup up on some foam tape. Using a red paint chip I die-cut the 'Coffee' from the 'Coffee Cup Fri-dies' and also two more times from black CS. I glued these all together and then to the front of the cup. I finished off with some black half pearls.


I hope you enjoyed my card and it gave you a few ideas for your own creations. If you haven't seen these coffee stamps/dies before and are thinking of making a purchase, don't forget to use my special code to save yourself 15%!!


There are plenty of projects to look at as you can see by all these thumbnails below. You can look at them all in any order you like and I'm sure you'll enjoy yourself!!


An InLinkz Link-up

Thanks so much for stopping by, I'm going to hop now myself and I can imagine I'll be blown away by everyone's creativity!!

Take care
Shona
 

Thursday 18 October 2018

Reminder: TIME OUT Challenge #120

Hi everybody!! I've had a super-busy week, the weeds are growing like 'weeds' and so is everything else in everyone's gardens. At least the weather has been gorgeous so its wonderful to be outside in the sun!!


Our current challenge theme at TIME OUT  is 'Colourful' which has our Gallery looking all kinds of fabulous!! You can make any type of project you like, with as many colours as you like. This is such a fun challenge!!

We are very lucky to have Winnie and Walter as our Sponsor for this challenge and they are giving the winner a $25 gift voucher. They were also very generous with the TIME OUT Design Team and I received a new Christmas stamp set that was perfect for lots of colour!!

 
I've always loved making Christmas cards with non-traditional colours and recently discovered a new colour combo that will be turning up on a lot of my Christmas cards this year:


All of these pastel colours and the fabulous 'candy house' makes me want to reach for a lollipop right now!! And I love light blue, red and white together, its so pretty but fresh and modern.

To start off I stamped the images from Winnie and Walter 'Sweet Holiday with Evelin T Designs' with Gina K Amalgam Ink on some Strathmore Bristol Smooth CS. I coloured them all in with Altenew Artist Markers and then fussy cut out.

For the background I blended Distress Oxide ink 'Picked Raspberry' on the card front, leaving a border around the outside. I then flicked on some water with a brush and dabbed with a tissue, to give the impression it was snowing. I then stamped the sentiment (from the same stamp set) with Versafine black ink.

The candy house was adhered to the card front, and the doggie and bear were popped on foam tape. To finish off I also glued on some sequins from Neat and Tangled.

I've got three challenges I would like to enter:


Cards in Envy Challenge (Favourite Holiday)


You have until Wednesday 24th October to link your projects to the TIME OUT Challenge and if your needing any inspiration pop over to the blog to see what the rest of the Design Team have created for you. I hope you have a chance to join us and look forward to seeing you in the Gallery!!

Take care
Shona


The Card Concept Challenge #100 - Guest Designer

This is a very exciting blog post for me!! My super talented friend Marcie of Sharp Designs sent me a message a few weeks ago inviting me to be a Guest Designer at The Card Concept challenge. They are celebrating their 100th challenge and the Design Team were asked to invite a guest to join in. I was super honored she asked me and of course I said yes straight away!!

Funnily enough I've always loved The Card Concept challenge. I used to have the time a few years ago to join in every single one, and one of my most viewed cards ever on my blog was for one of their Christmas challenges a long time ago, so I'm very happy to be helping them celebrate!! 


I don't know who chooses their inspiration photos but they are always gorgeous and offer so many ideas for your project. This is the photo for their 100th challenge. Its so stunning and with Thanksgiving coming up in the U.S. I know this is going to have an amazing Gallery of projects!!

For my card I definitely had to include some pumpkins, especially with soft pinks and golds. And find a way to add in some pretty flowers too:


My card comes under the 'Clean and Layered' category, since a have a few different elements on top of each other on foam tape.

I started off by heat embossing the pumpkins from MFT Stamps 'Witch way is the Candy?' in white and the flowers from Neat and Tangled 'Bloom' in gold. I coloured them both with a water brush and Zig Clean Color Brush pens. Once they were dry I fussy cut them all out.

To bring the elements together I blended some Distress Oxide ink in 'Spun Sugar' on the card front and stamped the sentiment from Neat and Tangled 'Scandinavian Prints Christmas' in black. The flowers were popped up on foam tape.

To add some gold to the pumpkins I used a small brush and Gina K Connect Glue on the lower part of each one. I then sprinkled on some WOW! Gold Glitter. Once the glue had dried I put these on foam tape, along with some sequins from Neat and Tangled.

Congratulations to the team at The Card Concept on your 100th challenge and here's to many, many more!!

And thanks so much Marcie for inviting me to play, so lovely of you to think of me and what a fabulous celebration to a part of!!

I hope you all have a chance to join in the challenge too!!

Take care
Shona
 

Wednesday 17 October 2018

CAS-ual Fridays Stamps - Girl Friday post #2 for October

Hi everybody, just wanted to let you know I'm up on the CAS-ual Fridays Stamps blog today with this rather creepy 'Halloween inspired' card:


We don't have raccoons in New Zealand but I've heard they sometimes get rabies and attack people/other animals. They are such cute animals but I don't think I'd like to come out my back door at night to these four 'nasties' who want to eat me for dinner!!

To find out how I put this together, pop over to the CAS-ual Fridays Stamps Blog!!

I'm going to link this to The Cats Pajama's Challenge #351 where their theme is 'Holidays'. 


I'll also link to the Cards in Envy Challenge  where they are looking for your 'Favourite Holiday'. Christmas is definitely my favourite but Halloween comes a very close second, its so much fun creating these crazy, creepy cards!!


Thanks so much for stopping by and I'll be back here tomorrow with another card....its a busy week!!


Take care
Shona

Tuesday 16 October 2018

Reminder: The Flower Challenge #25

Hi everyone!! This month seems to be whizzing by faster than any other. I think its because we've just had two weeks of school holidays, which was a blur of kids being here all the time and having sleep-overs. Suddenly its the middle of the month and the kids went back to school today....its crazy!!


It also means that we are already half-way thru our current challenge at The Flower Challenge where we are asking you to 'Add Sparkle' to your floral projects. There are already some amazing projects in the Gallery, your all so talented!!

For my card, instead of adding some sparkle to a die-cut, I used the same sparkling embossing powder on a stamped image and played with some Zig Real Color Brush Pens:


I've wanted this stamp image for such a long time, it was a real pleasure to finally stamp it out and colour it!!

I was in a stationary store the other week and came across a new watercolour pad. Its by Reeves and the sign said it was for 'Acrylic, Oil and Watercolour'. Its quite white and has a slight texture to it but its thicker than I normally use. The pad itself says its for 'Acrylic' painting but I thought I would give it a go. And so far so good!!

I stamped the image (from Simon Says Stamp 'Kind Flowers') on a piece of the Reeves paper with Versamark ink and heat embossed using WOW! Metallic Gold Sparkle Embossing Glitter. I then used my Zig pens and a little water to colour it in. When it came to colouring the 'KIND' I coloured it without any water so it would stand out.

I used a scallop-edged die from Winnie and Walter 'Essentials: Audrey's Cutaways' to cut out the image and added a piece of white foam to the back. I managed to find a piece of pink CS similar to the colours I used and cut it slightly bigger than the die-cut, adhered it to the card front and then glued the panel on top.

The sentiment (from the same SSS stamp set) was stamped on a strip of the Reeves paper with Versafine black ink and glued in place with a Gina K 'Connect' glue pen, along with some sequins from Neat and Tangled.

And here's a photo to show you how much this embossing powder sparkles:


I'm going to link this to the SSS Flickr Challenge #108 where their theme is 'Anything Goes'. I'm thoroughly enjoying playing along with this fortnightly and now I have a few more SSS products I can come up with more exciting designs!!

You have until Thursday 25th October to link your projects to The Flower Challenge and if your trying to find some new ideas on how to add sparkle, pop over to the blog to see what the rest of the Design Team have created. They are always inspiring me with their incredible designs!!

Thanks so much for stopping by and I look forward to seeing your floral projects in the Gallery!!

Take care
Shona