I know, I know....I did say yesterday that I wouldn't be making any more cards or doing any blog posts for a few days but it rained hard all night so wasn't able to garden today. And after cleaning the bathroom, toilet and vacuuming....I had a few minutes spare to play with new craft goodies...
Last week I received a new Altenew 'Spring Shower Cover Die' and was desperate to put it to use. I die-cut it a few times from white CS, separated out all the flowers (which took forever!!!) and then sat down today to colour, using this months Altenew Inspiration Challenge colours, while watching reruns of Scandal...heaven...
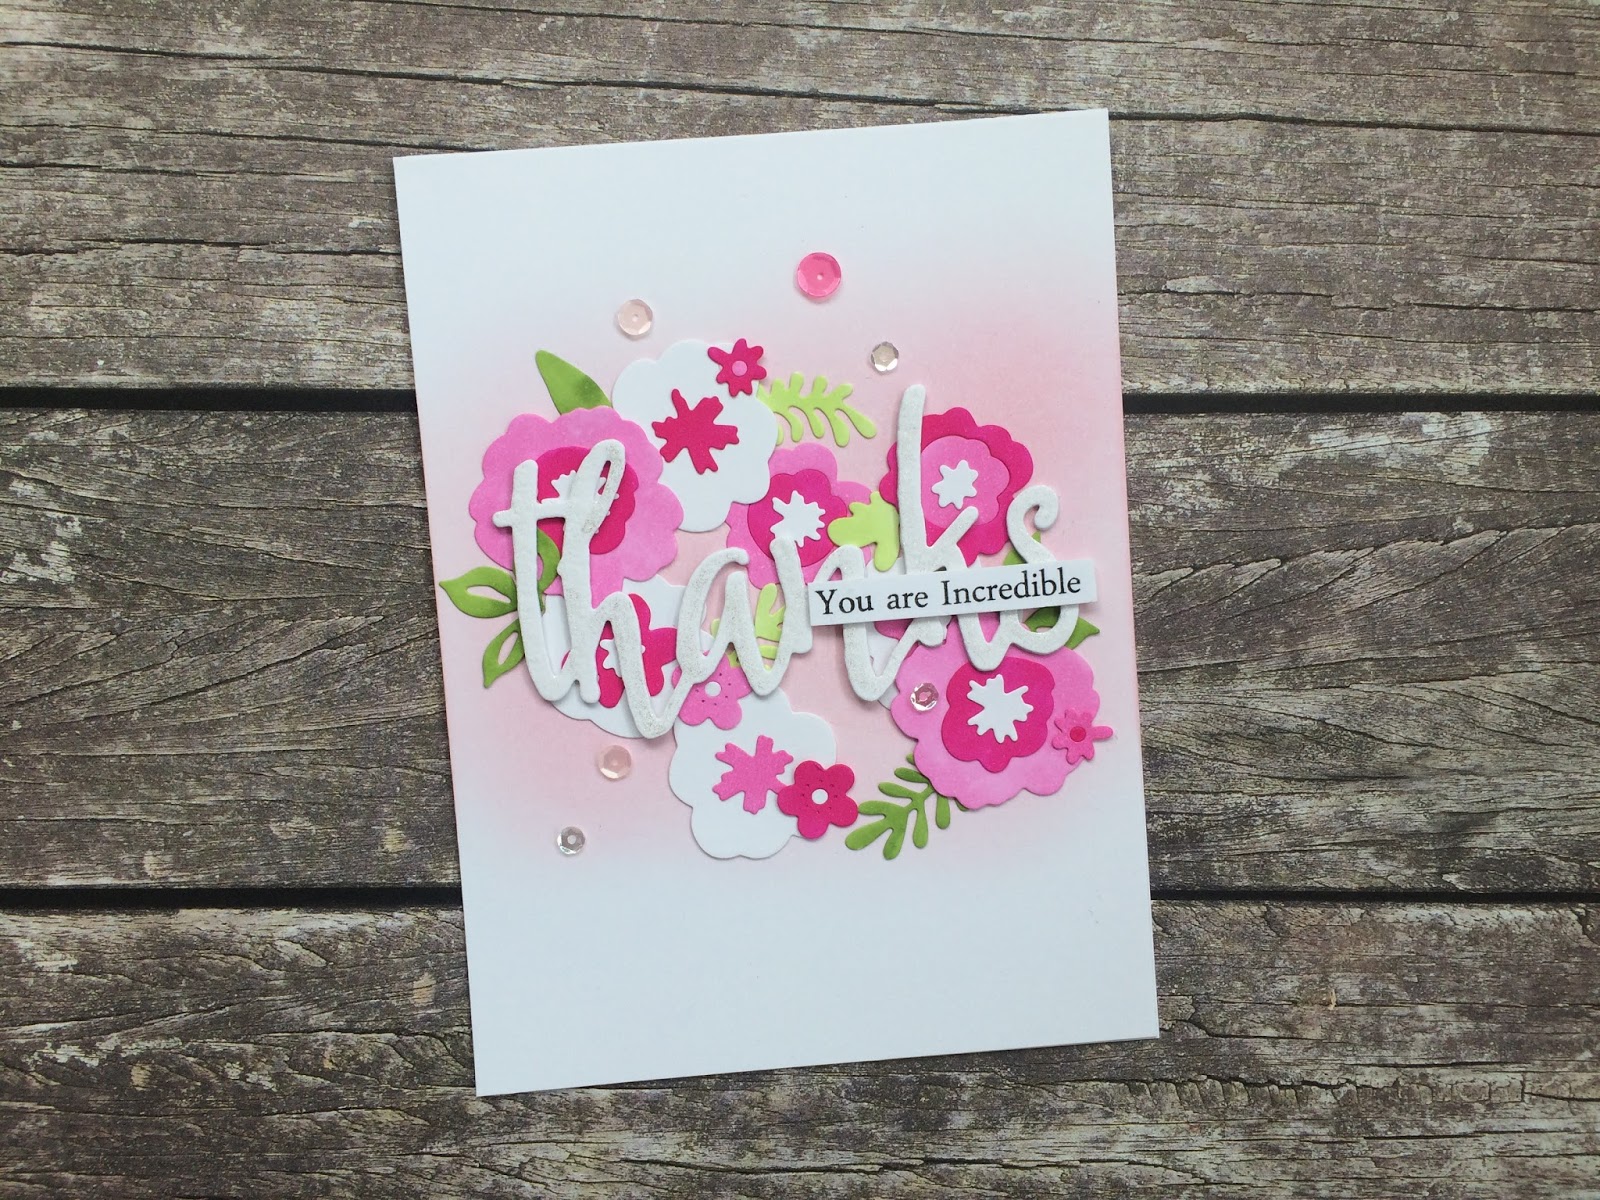
Using Altenew Set A green markers and some pink markers from #colouring, I chose some flower pieces to layer together and alternated the pinks with white. I also coloured some different leaves to add to the mix. I started arranging them on my card front and when I was happy, I took a photo with my mobile phone, so I could remember the design.
After using my mini-blending tool and Distress Ink 'Spun Sugar' on the card front, I set to work gluing all the flowers and leaves into place. I die-cut the Altenew 'thanks' die 3x from white CS, glued them all together and then over the flowers. I also gave it a good coating of Wink of Stella. The sentiment (from Altenew 'Persian Motifs' was stamped on a strip of white CS and glued into place, along with some sequins from Neat and Tangled.
The kids will be home shortly so better get prepared for all their stories about school. Phoebe always has lots to say but Max just wants to eat (as he never eats his lunch) and jump on the trampoline. He needs to jump and eat before divulging any stories about school. Maybe its a boy thing??
Take care
Shona
This is it, my 7th and final entry for the Winnie and Walter 4th Birthday Bash. I've had so much fun going thru all of my W&W stash, using sets that haven't seen love for a while and having such cool theme's to get my imagination spinning out of control!! And I even managed to make cards that could be entered in every single challenge, that's a first!
This last challenge is the Comeback Challenge with Taheerah. She is wanting you to CASE a card by one of The Talent and put your own spin on it. I found a card that I loved the minute I saw it last June (2017) by the amazing Mayuri:
My card is fairly similar to hers (I loved the design so much!!) but I added my own theme and die-cuts to change it up a little.
I started off by die-cutting a panel of Strathmore Bristol Smooth CS with the large rectangle die from W&W 'Essentials: Audreys Cutaways'. I then heat embossed Christmas images from W&W 'Happy Owlidays with Evelin T Designs' and W&W 'In Bloom: Frenchys Festive Florals with Angelica Suarez' in the same layout on the die-cut panel. Using a mix of Gansai Tambi watercolours and Distress Inks I very roughly painted over each image, using a darker colour to colour the image itself. Mayuri added black details to her images (which looks so much better) but I wanted mine to be softer.
Once the paint had dried, I stamped sentiments under each image from the same W&W 'In Bloom: Frenchy's Festive Florals with Angelica Suarez' set and popped the panel on the card front with foam tape.
I stamped the 'joy' (from the same W&W 'In Bloom' set) on some more Strathmore CS and heat embossed in gold. This was cut out with the matching die and put on foam tape. And to finish off I glued on a few sequins from Neat and Tangled.
I'm also going to link this to the W&W Grid Challenge with Keren and also the Die Challenge with Lydia.
And will also link to the Simon Says Stamp - Wednesday Challenge where the theme is 'Make your own Background'.
Whew, thats it, its over!! No more cards today, you (and I) can all have a rest...until I get ideas for another challenge. Lets hope that inspiration takes a few days to arrive.....Thanks so much for your patience and really hope you enjoyed all my cards!!
Take care
Shona
Eeeek, its entry #6 for the Winnie and Walter 4th Birthday Bash. Don't worry, I only have one more card to share with you after this and then I won't bother you for a while, I promise.......I think.....
This project is for the Anything But a Card Challenge with Kate. I hardly ever make anything else but cards. Usually I would make a present tag but I've done that so many times before. This time I wanted to make something that I would actually use:
I don't read very often these days and will start reading a magazine but never get very far through it and put beside my bed. I get so frustrated when I have a chance to read again but can't remember where I was up too, so a bookmark was definitely needed!! And because I'm a gardener, I wanted a floral theme!
I started off by die-cutting two pieces of white CS with the larger frame die from W&W 'Essentials: Audreys Cutaways'. I wanted the book mark to have the waffle edge all around it but needed it to be slimmer. Using the same frame die, I matched the top and bottom 'waffles' to the die and put the outer edge of the die at the width I wanted it. Its hard to explain so hopefully you get what I mean.....
Once I had done that I glued the two pieces together to make it stronger. I stamped the flower from W&W 'In Bloom: Addies Garden' on the bookmark and also on a piece of Inkadinkadoo Masking Paper, fussy cut it out and put it over the stamped image. I also stamped two sets of leaves (from the same stamp set) on the masking paper and fussy cut them, using them as I stamped the two rows of leaves.
I coloured the flower and leaves with my Faber Castell pencils and then the outside area with an Altenew Marker from Set A. I used a holepunch at the top and looped a blue ribbon through to finish it off!
Will also link to the W&W Die Challenge with Lydia.
This bookmark will be put to use tonight after I do my final W&W blog post. I'll need a break from my computer after the last two days of typing and blogging......
Take care
Shona
Its me again, I'm back with my 5th entry for the Winnie and Walter 4th Birthday Bash! I can't believe I made so many cards over three days but so happy I didn't miss out on taking part.
This time I'm joining the Using your Scraps Challenge with Kelly. To be honest I wasn't sure what I was going to do for this challenge but I suddenly realised that I didn't have to look far for lots of scrap pieces of CS:
Every time I make a card base, I use an A4 piece of CS. I cut a strip off the end so its 11inches in length and then cut it in half longways to make two top folding cards. So you can imagine, after making hundreds of cards, how many strips of white CS I have and I keep them in a container on my table right in front of me. I mainly use them for sentiment strips but I thought I could put them to a much more 'colourful' use for this card!
I grabbed ink pads from Waffle Flower 'Safe Choice' and Altenew 'Crimson' and 'Rose Quarterly' and rubbed the pads straight on the CS strips, going back and forth till the colour was solid. As I was using the colours from the Winnie and Walter 4th Birthday Bash 'Inspiration Challenge with Gayatri' I needed to add some gold. I went through my gold glitter CS stash and found a few wide strips left over, so was able to cut them down to a smaller width.
I covered the card front with double-sided tape and added the CS strips, cutting off the extra as I went. Luckily they were all cut straight so there were no major gaps!! While going thru my W&W dies I found a left-over W&W 'True Multifaceted Star Cutaway' from a red paint chip and thought that would be perfect as an embellishment on the card. I glued it off to the left-hand side, cut off the excess, put the sentiment (from W&W 'The Big, the Bold and the Happy') on foam tape and glued on sequins from Neat and Tangled.
Will also link this to the W&W Die Cut Challenge with Lydia.
I'm also going to link this to the Simon Says Stamp - Wednesday Challenge where their theme is 'Make your own Background'.
Two more projects to go and then I'll leave your inbox alone for a while. I managed to do some garden work today which was fantastic but its already started to rain again and tomorrow isn't looking good at all. If this keeps up working at the weekend might become the norm unfortunately......
Take care
Shona
I'm back with yet another entry for the Winnie and Walter 4th Birthday Bash!! This time I'm joining in the Repetitive Stamping Challenge with Crystal which is always one of my favourites. I love covering a whole card front with rows of stamps but this time I decided to try something different:
My Mum has been going thru my stash of birthday cards lately and always needs cards for children, so I thought I better create some more!!
You wouldn't think I've used a Christmas stamp for this card would you?? I stamped the front of the card with a polka-dot wreath from the W&W 'Comfort and Joy' set, using rainbow colours from Waffle Flower and doing diagonal lines with the rings over-lapping. I really love the effect and you know my feelings about rainbow colours!!
I didn't want to cover up much of the stamping, so I used a circle die from the W&W 'Essentials: Carly Cutaways' set and also die-cut a circle from white foam. I heat embossed the 'hugs from W&W 'The Big, the Bold and Friends' in gold and stamped the 'birthday' in black from W&W 'The Big, the Bold and Happy'. I added a piece of white CS behind the card front and adhered the foam circle and coloured one of top of each other for dimension. And I glued on some sequins from Pretty Pink Posh (its a sequin mix from a W&W birthday a few years ago) for some shine.
Will also link to the W&W Die Cut Challenge with Lydia.
I'm also going to link this to the Simon Says Stamp - Wednesday Challenge where they want you to 'Make your own Background'.
I'm off to work now, hopefully I can get thru the day without it raining on me, wish me luck!! And I'll be back with three more cards for the W&W challenges later today!
Take care
Shona
After the hot, muggy weather of the past few weeks, todays wet, chilly temperature is a bit of a shock to the system. I'm going to have to go and put some more layers on shortly and some socks!!
I'm up on the CAS-ual Fridays Stamps Blog today with lots of die-cutting:
I haven't made a fiddly card for a while, so this was a lot of fun to do and I'm in love with the colour combo, so will have to do this again!!
I started by grabbing a big piece of Strathmore Bristol Smooth CS and watercolouring away to my hearts content with Distress Inks 'Picked Raspberry', 'Worn Lipstick' and 'Abandoned Coral'. I kept drying it with my heat gun and adding more colour until I was happy with the result. I then die-cut the Heart Board Fri-die from it twice. I also die-cut the heart again a few times from white CS to use the extras for dimension.
While I was die-cutting, I die-cut the heart twice from the card front, leaving a teeny-tiny space between them both. I then adhered a piece of white CS behind them to help with the inlay process. I added the largest heart first so it was level with the card front. I then added a white one of the next size with the coloured heart on top. I then carried on with each layer, adding 2 extra, then 3 extra and then 4 extra white die-cuts to make each coloured heart layer higher. I hope that makes sense!!
For the sentiment I didn't want to cover up any of my coloured hearts, so I die-cut the arrow from the same Heart Board Fri-die set from white CS and stamped the sentiment from the Cupids Arrow stamp set. And I also glued on some Neat and Tangled sequins for a bit more sparkle!
If your wanting to purchase any of the products I used today or any others from CAS-ual Fridays Stamps, don't forget to use my special code to save yourself some money!!
Its really cold now so I'm off to put on my long leggings, socks and a warm sweatshirt, which is so weird because I was in shorts and t-shirt until bedtime last night as it was so warm. Mother Nature is so fickle!!
Take care
Shona
When I first saw all the different challenges for the Winnie and Walter 4th Birthday Bash, one of them struck me as being a tricky one to get ideas for but for some reason its the one that has inspired my cards the most!!
The Grid Challenge with Keren is where she wants you to have some sort of grid or grid inspired design on your project. Its actually way more easy to come up with ideas than I thought and two of my cards have ended up with grid patterns without me even thinking about it!! Turns out I use grid designs all the time!
This is one of those long-winded, extra-fiddly cards that I love to create so much. And it reminds me that I must get out the vacuum cleaner to clean up all the millions of tiny hearts on my carpet!
I started out with the simple part first, the large heart image. Its from the W&W 'From the bottom of my heart' set and I stamped it 3x with Mama Elephant 'Apple' pigment ink (and using my MISTI) to get good coverage. I then fussy cut it out and added foam tape to the back.
For my background I used the smaller rectangle die from W&W 'Essentials: Audreys Cutaways' on some white CS and then used the strip of heart dies (from the same die set) to cut individual rows down the panel. They aren't perfectly straight or lined up but if you look at it quickly, its not too bad.
Now came the fun part. I wanted to add some colour to the panel but not the whole thing. So I cut a piece of clear acetate and glued it behind the panel. I then grabbed some red, dark and light pink paint chips and die-cut a row of hearts from each. With my Quickstik I added little dots of glue in the die-cut heart hole and pressed the coloured hearts into them. It took a bit of time but the Quickstik made it alot easier. Once I had finished I added a few strips of double-sided tape to the back and adhered to the card front. The red heart was popped up on the front and of course I had to add some co-ordinating sequins from Neat and Tangled.
I'm also going to link this to the W&W 4th Birthday Bash - Inspiration with Gayatri Challenge as I used the same colours for my card.
I'll also link to the W&W Die Cut Challenge with Lydia.
Will also link to the Simon Says Stamp - Wednesday Challenge where they want you to 'Make your own background'.
Three entries down, four more to go, so I'm afraid I'll be doing a few more posts today and tomorrow. You won't be able to get away from me!!!!
Take care
Shona
Okay, here I am again with card no. 2 for the Winnie and Walter 4th Birthday Bash!! I have to mention that I tried to put the graphic for the birthday challenges on my blog posts but I can't work out how to copy it as the image is from a Flicker account. If anyone has any advice on how to do it, I would love to hear from you!!!!
This time I'm entering the Shaker Challenge with Lea. I used to make shaker cards all the time but haven't for a while now, so this was my chance to go foam tape and sequin crazy!!
Firstly I die-cut a piece of grey CS with the smaller rectangle die from W&W 'Essentials: Audrey's Cutaway's' and adhered it to the card front. I then heat embossed the W&W 'Mini Scenery: Madison' stamp in white on a piece of Strathmore Bristol Smooth CS. Using my Zig Real Color pens I watercoloured it and when dry, fussy cut it out.
For the shaker window I used a circle die from W&W 'Essentials: Carly Cutaways' and glued a piece of acetate behind it. I gathered up some Neat and Tangled sequins in similar colours to the watercolour panel, popped them on the grey die-cut. Lots of foam tape was added to the shaker window panel and it was pressed over the sequins to seal the shaker.
For the sentiment I die-cut the W&W 'hugs' die from silver mirror CS and adhered over the window, with the 'my love ' (from W&W 'The Big, the Bold and Love' set) on a strip of white CS.
Will also add to the W&W Die Cut Challenge with Lydia.
Better go and do some housework before I make some more cards, just incase my husband comes home and asks what I've been doing all day........ Thank goodness the dog and cats can't talk as they would tell him what I've REALLY been up to at my craft table...
Take care
Shona
How strange of me to leave it to the last 3 days of a challenge to make the cards??!! I think I must work better with pressure as I used to do the same with all my school assignments too, working all night the night before it was due and somehow still getting good marks. Very strange indeed!!
The month of February is Winnie and Walters 4th Birthday and they have so many challenges you can enter. This card is for the Winnie and Walter - Four Challenge with Shay. She is wanting you to design something with the number four as the inspiration. I decided to incorporate three challenges together to come up with this card:
I tried something new with this card. I've watercoloured a lot of flowers and leaves but never any animals, so this was a real learning curve. I'm kind of happy with the result but sure have a lot more to learn!!
I started off by die-cutting a piece of Strathmore Bristol Smooth CS with the smaller rectangle die from W&W 'Essentials: Audrey's Cutaways'. I then used the x's and o'x die (from the same Cutaway set) to create a grid across it. One of the other birthday challenges is the Grid Challenge with Keren so thought this was a good way to incorporate it into my card design.
I used my mini-blending tool and Distress Inks 'Mermaid Lagoon', 'Twisted Citron', 'Picked Raspberry' and 'Mustard Seed' to colour the four blocks. I then sprayed the panel up close with Imagine Crafts Shear Shimmer Sparkle Spritz (what a mouthful!) and blotted with a tissue so it has some interest and lots of sparkle.
I stamped four of the animals from W&W 'Welcome to the Family with Evelin T Designs' on the same watercolour CS with Versafine ink and heat embossed with clear powder. I then attempted to watercolour them with a mixture of Distress Inks, Gansai Tambi and Zig Clean Color paints. When they were dry I fussy cut them on and popped them on foam tape. The whole panel was then put on the front of the card with foam tape and I glued on some Neat and Tangled sequins for a bit more shine.
I'm also going to link this to the W&W Birthday Bash - Watercolour with a twist Challenge with Heather as she wants you to use another colouring agent along with your watercolour. I've used Distress Inks. And will also link to the W&W Die Cutting Challenge with Lydia.
Will also link to The Cats Pyjamas Challenge # 343 where their theme is:
I've got four more cards to link at this stage and only two more days to make some more. Its raining here AGAIN which means another day of no gardening work, which is so frustrating. However the good thing is that I can link all my W&W cards, make some more and play with all the new products that have arrived lately. Maybe rainy days aren't too bad after all.....
Take care
Shona
I wish I didn't procrastinate so much!! I've been wanting to enter a card in the Uniko Challenge for weeks and finally made a card that was finished last night. Have just sat at the computer to send some emails this morning (Saturday) and suddenly realised I have only 1.5hrs to link my card....eeek! Thank goodness there was some sun around so I could take a good photo. If only I had gotten myself organised earlier I wouldn't be in a panic writing this post!!!
I was extremely lucky to recently receive some new stamps from Bev (the owner of Uniko) and wanted to pair one of those with some of the very first Uniko stamp sets I ever purchased:
I was dying to try out this Uniko 'Scattered Polka Hearts' background stamp, so grabbed my MISTI and stamped in Waffle Flower 'Safe Choice'. I thought it looked a bit plain so decided to stamp it again but slightly over and down with Waffle Flower 'My Pleasure' and love how it turned out!!
I stamped the flowers (from Uniko 'Flower Power #5) with the same dark coral colour and the leaves with Waffle Flower 'Chirp Chirp!'. I fussy cut them out, put the flowers on foam tape and the leaves were glued to the card front. I stamped the sentiment (from Uniko 'Flower Power #3) on a strip of white CS and put that on foam tape too, along with sequins from Neat and Tangled. I also added some shimmer to the middle of the flowers with my Wink of Stella but must have gotten carried away as its made the ink bleed, which is so annoying because now that's all I can see!!
I'm also going to link this to the Simon Says Stamp - Wednesday Challenge where their theme is 'Make your own Background'.
Right, I better get this card linked to the challenge before I run out of time. Phoebe had some friends stay over last night for her birthday and I can hear them tucking into chocolate cake for breakfast. Sounds like a good idea actually, might have to join them.......
Take care
Shona
Its been a fabulous day here today. My daughter Phoebe turned 13yrs old today and she has 3 friends here for a sleepover. Its been very loud and there is a lot of laughing going on but I'm so happy for her. It only seems like the other day that we brought her home from the hospital, petrified that we wouldn't know how to look after her. I really miss those baby/toddler days, where I could pick her up and cuddle her or walk around with her in my arms. However, seeing her become this young woman, with an incredible personality and kindness, it will be amazing watching her on her way to adulthood.
During the week I created two birthday cards for her. The one I'm sharing today is a little young for her but she loves it and knowing the stamp image is called 'Phoebe' too is brilliant:
This little girl reminds me so much of Phoebe when she was 2yrs old. She used to wear her hair in pigtails like this and she has always loved being around animals. This is the reason I bought this stamps set!!
I started by using my mini-blending tool and Distress Ink 'Mowed Lawn' on the bottom part of the card front. I had an idea to use my MFT 'Fresh Cut Grass' die-cut as a stencil along the top to give it more of a 'grassy' look. It was a bit of a disaster, so blended over it and actually like the look of it now!! I then used my MFT 'Cloud' stencil and Distress Ink 'Mermaid Lagoon' to create the sky. This stencil is so cool and love the background it creates, its like magic!!
I stamped Phoebe, the dog, cat, cake and wagon (from Your Next Stamp 'Phoebe with her wagon') with black ink on some white CS. I coloured them with my Faber Castell pencils, fussy cut out and added to the card front with foam tape. The sentiment (from the same YNS set) was stamped on white CS, adhered to some black CS and cut to create a small frame. This was put on foam tape along with some sequins from Neat and Tangled.
Its suddenly gone very quiet in Phoebe's bedroom so better check whats going on. Max is hiding himself in his bedroom and I think Dave and I will do that soon as the girls are sleeping in the lounge room. Its times like this I wish we had a bigger house. A fourth bedroom or rumpus room would be so good right now but if we had that I would have nabbed it for a craft room and wouldn't be sharing that with a 'giggle of girls'!!
Take care
Shona
Hello there!! Its nearly Friday so that must be good, especially after the week we've had here weather-wise. We spent Monday and Tuesday waiting for Cyclone Gita to hit which brought lots and lots of rain but we got none of the high winds at all (thank goodness). It did though stop me from gardening for the last 3 days which has me incredibly behind but not much I can do about Mother Nature!! Its also Phoebe's 13th birthday tomorrow, so that's a brilliant way to end the week!
I was wanting to remind you all about our current TIME OUT challenge where we want you to design something around your hobbies, with the option of making it one-layer. There are already so many incredible projects in the Gallery, you are all so talented!!
Our Sponsor for this challenge is CAS-ual Fridays Stamps who are giving the winner a $25 gift voucher to their store. Talk about lucky!!
I have a few different hobbies, card making of course being one of them but I wanted to show you one of my favourites:
I love creating one-layer cards and haven't made one for a while, so this was the perfect chance to see if if I could still do it!!
Apart from eating, one thing I love to do is baking. I'm very well known for my chocolate brownies (to the point where Max was having them stolen from his lunchbox every day....) and my Christmas Cowpat Cookies are known world-wide. I definitely got the baking bug off my Mum. I loved baking with her when I was little and its wonderful passing it on to my own children.
I grabbed my Neat and Tangled 'Holiday Baking' stamp set and stamped the images in black towards the bottom of the card. I coloured them all with my Faber Castell pencils and tried to make the bear look furry. It didn't look right though so I added a faint grey pencil line and shading to make it look like the bear was sitting on the floor. All I had to do then was stamp the sentiment and glue on some Neat and Tangled sequins.
I'm going to link this to The Cats Pyjamas Challenge # 343 where their theme is:
You have until Wednesday 28th February to link your projects to the TIME OUT challenge. And if your needing some ideas, pop over to the blog to see what the rest of the Design Team and our fabulous Guest Designer Ashwini of Experiments with Card Making etc have created for you. I can't wait to see what hobbies you share with us!!
Take care
Shona
We've had an interesting week so far here weather-wise. Monday was very hot and sticky, yesterday it rained from 6am to 9pm non-stop and now today its sunny. We were all preparing for the arrival of Cyclone Gita and its 130kph winds but didn't get any wind at all!! Very lucky indeed! This also means that I couldn't garden yesterday and can't today either because everything is so wet, so have been catching up on housework and card making!!
I'm slipping in an entry for the current Simon Says Stamp - Wednesday Challenge where their theme is 'Add a die-cut'. You all know how much I love a good die-cut, especially a fiddly design but decided to get inky with a stencil instead:
I love rainbow colours on a card but I hadn't tried to create one with this stencil, so the time was right!!
I used washi tape to hold the MFT 'Radiating Rays' stencil over the card front. Using my mini-blending sponges and a rainbow of distress inks I blended circles of colour from the inside out. I didn't want to cover up too much of my rainbow, so die-cut the 'hello' die (from Simon Says Stamp) 3x from black CS, glued them together and then to the card front, adding lots of Glossy Accents on top. I then stamped the sentiment (from MFT 'Bitty Bears') on a strip of white CS and glued it in place along with some sequins from Neat and Tangled.
I'm also going to add this to the CAS on Friday Challenge # 126 where their theme is also 'Dies'.
I'm off to the supermarket now and then will take Bella for a walk. We can't run along the riverbank as we normally would because of flooding, so will wander around the neighbourhood looking at other peoples houses and gardens. I find it so hard though being a gardener and seeing so many beautiful gardens overflowing with weeds. I just want to jump the fence and tidy it all up!!
Take care
Shona
Hi there everyone!! We've reached Friday here in New Zealand, which means its not far away for you too if your on the other side of the world. Its been such a long, hot week here, so I'm looking forward to a bit of relaxation over the weekend!!
I'm just popping in to tell you all about the current theme at The Flower Challenge:
We have 'Paper Piecing' for you this month which is a huge challenge for me but I love trying something new and my second card for the month is much better than the first:
I found this multi-coloured paper from a 6x6 pad by Rosies Studio '#happy'. I stamped on some flowers from Altenew 'Adore You' in black ink, fussy cut them out and arranged them on the card front along with some leaves that were coloured with the Altenew Artist Markers Set A. The largest flower is on some foam tape to add a bit of dimension.
The sentiment (from Altenew 'Floral Shadow') was stamped in black ink, fussy cut out and adhered to the flower, with some foam tape holding it up as well. And to finish off I added some pink, green and gold sequins from Neat and Tangled. I love how it turned out and must try this technique again!!
You have until Sunday 25th February to link your projects to The Flower Challenge and if your still struggling with ideas, pop over to the blog to see what the rest of the Design Team have created to inspire you. Looking forward to seeing you in the Gallery!!
Take care
Shona
Well, hello there everyone!! Wonderful to see you all and hope your week has gone fabulously so far. Its still been very hot here and my husband is telling me I'm starting to look like a raisin. There's only so much sunblock I can rub on each day so I think I need to get a very wide-brimmed hat!!
I'm up on the CAS-ual Fridays Stamps Blog today with a card that would be perfect for Valentines Day:
This was so much fun to make!! I heat embossed the Heart to Heart Background Stamps in white on a piece of Strathmore Bristol Smooth CS. I then set myself up with my Ipad, Altenew Artist Markers Set A and some chocolatey snacks and spent a few hours watching Netflix and colouring the hearts. Heaven!!
Once I was finished I fussy cut the panel out and laid it across the card front on an angle, so I could draw some pencil lines of what would be sitting on the card. I grabbed the Love Ya Fri-die and die-cut it from the middle of the panel, keeping all the pieces. I then die-cut it again from a dark red paint chip. A strip of white CS was added behind the panel and the words inlaid into it. This was then popped up on the card front with foam tape, with the overhang removed and some co-ordinating sequins from Neat and Tangled glued on for some sparkle!!
I hope I've given you some ideas on how to use your background stamps a little differently, and if your tempted to buy the products I used today don't forget to use my Girl Friday code to save yourself 15% on your purchase!!
I'm going to link this to the Simon Says Stamp - Wednesday Challenge where their theme is 'Add a die'.
And will also add to the Simon Says Stamp - Work It Wednesday Challenge where their theme is 'Love'.
And lastly will jump in at the last minute to the AAA Card Challenge #108 where their theme is:
Thanks so much for stopping by and I hope you all had a fabulous Valentines Day!!
Take care
Shona
Hi everybody, hope your week is going well and you've had some time to create in your craft room!! I was just wanting to remind you about our current TIME OUT challenge. We have this very stylish photo to inspire you:
All that black and white with the hint of gold and timber floors....oh the possibilities!! You can use whatever element you like about this photo to inspire your design, maybe the striped pattern, woodgrain or 'love'.
We have Stamplorations as our Sponsors for this challenge and they are giving a $15 gift voucher to the winner!!
For my card I was immediately drawn to the black and white striped pattern but I also wanted to soften the design with a cute nod to 'love':
I realise there are no otters in the inspiration photo but I love the sentiment that comes with their set, so I just had to use their sweet faces on my card.
I found this amazing patterned paper in a 6x6 pad from Fancy Pants 'Office Suite'. I used a stitched-waffle edged die to cut it out and then die cut the 'hello' from the middle. It was a bit hard to photograph but I found this really shiny gold paper from Crea8tiv, adhered a strip of it to the middle of the card front and then popped the die-cut panel over top on lots of foam tape.
My otters were stamped in black on white CS, coloured with pencils and then fussy cut out. I glued them into place, along with the sentiment. And of course I had to add a bit more shine with some gold sequins from Neat and Tangled.
The 'hello' die is from My Favourite Things, as well as the waffle-edged die from the 'Blueprints 27' set. The otters and sentiment are also from MFT Stamps and are from the 'Otterly Love You' stamp set.
I have three challenges I would like to enter:
Simon Says Stamp - Wednesday Challenge (It Must be Love)
Simon Says Stamp - Monday Challenge (Love is in the Air)
Simon Says Stamp - Work It Wednesday Challenge
You have until Wednesday 14th February to link your projects to the TIME OUT challenge. And if your struggling for ideas, pop over to the blog to see what the rest of the Design Team and our fabulous Guest Designer Trina of My Crafting Closet have created for you. Can't wait to see your projects in the Gallery!
Take care
Shona
Welcome to February and a new challenge theme at The Flower Challenge!! I'm quite amazed that we are already on to the second month of the year, feels like Christmas was just yesterday! We have quite a cool theme for you this month and one that's definitely a challenge for me:
From my understanding its where you use patterned paper instead of plain with your stamped and die-cut images. I hope that's correct.....
Its not something I do ever, so struggled with this a bit but after some fiddling around with all my gorgeous paper pads I never use, I came up with this:
I made this card last weekend when I stayed with my Mum and out of all the cards I made, this was my daughters favourite!!
I started by selecting the paper pad 'Uptown Chic' from Craft Smith, which is all pale blue, pink and gold...so yummy!! I decided to use a die-cut that has never been used because its supposed to be used with the co-ordinating stamp set which I don't own and bought accidentally. I die-cut the flower and leaf shapes, adhered the flowers together and then the leaves behind foam tape. For a bit of interest with the middle of the flower, I glued on some black half-dome beads in different sizes.
I was going to put the flower on the front by itself but it needed something else, so I die-cut the background die from white CS and glued that to the card front before adhering the flower. The sentiment was heat embossed in gold, fussy cut and put on foam tape too, along with some co-ordinating sequins.
The stamps and dies are all from Altenew. The background die is 'Layered Medallions Cover Die B', the flower dies are the 'Floral Fantasy Dies' and the sentiment from Floral Shadow. The sequins are from Neat and Tangled.
I'm going to link this to the Simon Says Stamp - Wednesday Challenge where their theme is 'Anything Goes'.
You have until Sunday 25th February to link your projects to The Flower Challenge and if you need more ideas on how to do 'paper piecing', pop over to the blog to see what the rest of the Design Team have created for you. And we will be back with some more ideas on the 15th, see you then!!
Take care
Shona
I've got a very cool post for you today. I'm up on the CAS-ual Fridays Stamps Blog today along with one of my bestest crafting buddies!!
Michele (the owner of CAS-ual Fridays Stamps) asked all of the Girl Fridays to invite someone to create a card with, using the same stamp set. I immediately thought of my fabulous friend Coni of Which Craft? who not only is the sweetest, funniest and supportive friend but a brilliant card maker as well. Thank goodness she said yes to my invite and we decided to use the new stamp set Coffee Talk:
We also decided to include some watercolouring in our design and use the Coffee Cup Fri-dies as well. This is what I came up with:
I actually wanted to create something with more watercolouring involved but every image I tried to colour looked ghastly, so they all ended up filed in the rubbish bin. Buggar!! I need to practice with my paints everyday, if only I had time to do that!
I started by cutting a panel of watercolour CS slightly smaller than my card front. Using a big round brush, my Gansai Tambi watercolour paints and lots of water, I created this ombre look. Once I was happy with it and it had dried, I tried (for the first time ever) to emboss with the Coffee Cup Fri-die. This is when I realised I couldn't find the other plate for my Cuttlebug and scrounged up as many pieces of CS I could find to replace it. Good old 'kiwi ingenuity'!! I was so happy with how it turned out, gotta do this more often!
I stamped and heat embossed the 'coffee' from the Coffee Talk stamp set in gold on the panel, and then popped on the card front with lots of foam tape. The sentiment (from the same stamp set) was stamped in black on a piece of white CS and put on foam tape, along with sequins from the Sistahood Sparkle Sequin Mix and gold ones from Neat and Tangled.
I'm sure you are itching to see what Coni made with the same products, so pop over to the CAS-ual Fridays Stamps Blog to see her spectacular designs!
I'm going to link this to the Simon Says Stamp - Wednesday Challenge where their theme is 'Anything Goes'.
Thanks so much for stopping by. I'm off to leave some love for my crafty bestie. I'll see you back here again soon!
Take care
Shona