Pages

Saturday, 27 August 2016

Guest Designer for Inkspirational Challenge # 116

Hi everybody, I'm super excited today as I get to be a Guest Designer for the Inkspirational Challenge!!!


I was lucky enough to win one of their challenges  few months ago, so was very honoured to be invited to join in!! This challenge always has the most interesting challenge ideas and photos, so if you haven't tried it out already, I really encourage you to take a look!

The theme for this challenge is 'Colour - Primary Colours'. You are to use one, two or all three of the primary colours (red, blue and yellow). You can also use black, white or cream and realistic colours like skin, fur and hair. I decided to use all three of the colours and make them the star of a graphic card:


I used a brand new die that I grabbed at the Wellington Papercraft Show (last weekend) and cut it twice from black CS. I glued them together and then popped it up on the card front. I then grabbed my trusty box of paint chips and used the die to cut out the blue and yellow circles. I added tape to the back of the circles and pushed them into place. I then used a stitched-heart die on a red paint chip, popped it up on foam tape and added Wink of Stella and Glossy Accents to make it shine.

For the sentiment I used one of the black die-cut circles that were left over and heat embossed it in white. This was put on foam tape as well. And that was that. Bold, graphic, clean...just the way I like it!!

The square die is from My Favourite Things 'Peek a Boo Squared'. The heart die is also from MFT 'Hot Cocoa Cups'. The sentiment is from Concord and 9th 'Map Love'. 

I'm going to link this to the Simon Says Stamp - Wednesday Challenge where their theme is 'Hip to be Square'. 


You have two weeks to link your projects to the Inkspirational challenge and their amazing design team have some projects on the blog to help you with ideas. Thanks so much to the Inkspirational team for letting me join them for this challenge and I can't wait to see all the projects in the Gallery!!

Take care
Shona
 

Thursday, 18 August 2016

Time Out Challenge # 64

Happy Thursday everyone and welcome to a new challenge at TIME OUT! We have the most amazing card for you to CASE for this challenge:


Isn't this gorgeous!! This card is created by the one and only Julia Alterman from Just One More Card.   She is the most amazing card designer and her colouring is incredible. She's also a real sweetheart so its lovely to be CASEing one of her cards.

Our Guest Designer for this challenge is my fabulous friend Jenny of Craftmosh. She creates the most beautiful CAS designs and blends like a pro, so you really must pop over to her blog to see her other projects, you won't be disappointed!!

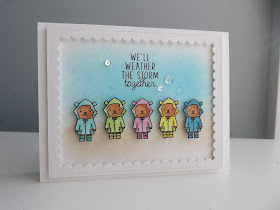
For my card I wanted to create a framed design and something with colouring involved. I think some of our Winter weather here in New Zealand inspired my design:


Its funny, I think this little bear image is so cute but after I put them all in a row on this card I thought they looked a little creepy, kind of like 'Children of the Corn'.  I think its because they aren't smiling but it does make me smile everytime I look at it!! LOL!


For this card I used a new card base. I'm probably the last person on earth to have tried this card stock but I finally have some Neenah 110lb card stock!! Lowri from Papervine gave me some to try out (comes in 10 pre-scored cards). The thickness and weight is fantastic and blending on it with the Distress Inks was heavenly. So now I can see what everyone has been raving on about!!!

I started off by die-cutting the frame twice from white CS and gluing them together for more stability. I put it over the card front and marked lightly with a pencil where the frame would sit, so I knew where to stop blending. I used Distress Ink 'Mermaid Lagoon' and my mini-blending tool to create the sky. I don't have a light brown/dirt coloured distress ink so I used my Waffle Flower 'Coffee Loves Milk' ink pad and it was perfect!!

Once I was happy with the blending, I sprinkled on some water droplets and pressed with some tissue to remove the ink, to give it the look of rain. I stamped the sentiment in black and popped the frame on with foam tape. I stamped the bear image 5x on white CS and coloured using my Faber Castell pencils. These were all fussy cut out, popped up on foam tape along with some clear and blue sequins. 

The bear image and sentiment are from Mama Elephant 'Chance of Rain'. The frame die and sequins are from Pretty Pink Posh.

I'm going to link this to the AAA Card Challenge # 71 where their theme is:


Will also link to the Simon Says Stamp - Wednesday Challenge where their theme is 'Make for the Border'.


You have two weeks to link your project to the TIME OUT challenge and if you need any ideas on how to CASE Julia's card, pop over to the blog to see what the rest of the Design Team have created for you. Can't wait to see your cards in the Gallery!!

Take care
Shona


Little Tangles Challenge # 71

It was my birthday yesterday and I had a wonderful day. I really wanted to spend the whole day crafting but after school drop offs, washing, vacuuming and dog walking there wasn't much time left. But....I was determined to try out a card design I thought of while walking the dogs the day before (really must take a pad and pen with me as its where I get most of my ideas....). I didn't think it was going to work but after 2 hours of fiddling, I had a result!!

I love to make shaker cards and I'm always trying to find ways to make them a bit more interesting. I don't own many Neat and Tangled dies unfortunately but really wanted to use one of them to enter the Little Tangles challenge. It turned into a real marathon of firstly working out where to cut and then dealing with all those micro beads but I'm am over the moon with how it turned out:


 Now you can see why it was fiddly!!! I really wanted to show a broken heart but spent ages trying to work out where to cut the die-cut so that most of the triangle spaces were still intact to hold micro beads. My brain was ready to explode but I did the best I could.

So, to do this I firstly used a new product here in New Zealand. Its A4 sheets of double sided adhesive by Rosies Studio. I thought this would be good to try it out so I cut a piece of white CS big enough to fit the heart, adhered it to one side of the sheet and cut it out. I ran it thru my Cuttlebug a few times with my new metal shim and it worked a treat. I removed the backing and adhered a piece of acetate and cut away the overhanging edges. I then cut the heart along my planned route.

Next I cut a piece of white foam, adhered it to the adhesive backing and run it thru with the die. I then realised I really need it on both sides of the foam so I had to use some Glossy Accents to adhere the foam to the acetate side. Before I did this I had to cut the foam into its separate halves. Once this had dried I poured in the micro beads, trying to keep the colour separate which didn't work completely but oh well. I then removed the adhesive backing from the foam and pushed a piece of white CS on to each piece. Holding my breath my picked them both up and tah dah, the beads didn't fall out!!! 

I trimmed off the overhanging CS from each half. I cut a panel of white CS slightly smaller than the card front and popped it up on foam tape. I then adhered the 'broken heart' in place. The sentiments were stamped with black ink, fussy cut and put on foam tape as well. I can't believe it worked!!!

As well as the Faceted Heart Die, the sentiment stamps are also from Neat and Tangled 'Everyday Labels'. The micro beads are from Papervine.

I'm going to link this to the  Stamplorations CAS Challenge - August where I haven't used the optional twist of gold.


Will also link to the Happy Little Stampers Challenge - Anything Goes with Dies - August 


I'm going to take this card with me to the Wellington Papercraft Show to show people how to use the micro beads we will be selling. I actually better start packing too and make sure I have a spare bag of Peanut M&M's to take with me for energy. Flying out tomorrow (Friday) morning at 9.25am, will spend the day setting up and then the show is Saturday/Sunday. I can't wait to be surrounded by fellow crafters again!!

Take care
Shona


Wednesday, 17 August 2016

Paper Smooches Challenge - August (entry no. 2)

Hi everyone! A busy day on my blog today as I'm linking a few cards to challenges that I made for this weekend. I'm off to the Wellington Papercrafts Show to help my friend Lowri with her Papervine stall, so another 3 days of talking craft, craft and more craft...yippee!!

In my previous post I showed you two cards that I made using the new Kaisercraft Gel Pens. I used only the metallic ones. Lowri is selling the gel pens in her store, so thought I better make a card that showed all the other gel pens as well, so we can show people at the show what they are like. I decided to get a bit crazy with bright colour and this is what I came up with:


There are Neon, Pastel, Metallic and Glitter pens used on this and I tried to capture the shine and glitter in my photo but was a bit tricky. In real life this card is so shiny and I can't get over how much glitter is in those pens. They are so lovely to use too and would be fantastic with some colouring books.

I wanted to choose some images where there were lots of different parts to colour and thought this stamp set from Paper Smooches 'Daisies and Paisleys' would be perfect. I cut a panel of white CS and randomly stamped the images in black ink. All I had to do then was colour and I tried to use everything in my 48 gel pen pack.

Once I was happy I trimmed the panel so it was slightly smaller than my card front and popped it up on foam tape. For the sentiment I die-cut the 'friend' die (from Paper Smooches) 3x from black CS, glued them all together and then to the card. The sentiment (Paper Smooches 'Uplifters') was stamped and heat embossed in white on black CS and then adhered in place. I then glued on a few sequins from Neat and Tangled for a bit more interest.

The Paper Smooches challenge this month is 'Friendship' so thought this card  would be perfect.


I'm also going to link this to the Simon Says Stamp - Wednesday Challenge where their theme is 'Lets go Wild', as this colour combo is definitely not my usual style. Its pretty crazy and out there but I love how eye catching it is!


Better organise some dinner for the kiddies. Max has just finished soccer practice and now Phoebe has gone to gymnastics for an hour. Wednesdays are busy in the afternoon/evening but its the only day a week that we have two things going on. On Tuesdays Max plays Futsal from 5pm to 6pm so Phoebe and I walk over to McDonalds and use their wifi to go on Instagram and laugh at funny videos. Every other day is completely clear after school which is great for us to be able to chill out and catch up with each other. 

Take care
Shona
 

Simon Says Stamp - Wednesday Challenge

Popping in today with a couple of cards for the Simon Says Stamp - Wednesday Challenge where their theme is 'Let's Go Wild'!! 


I'm off to the Wellington Papercraft Show on Friday morning to help my friend Lowri with her Papervine stall. She is now selling the new Kaisercraft gel pens from her online store. After finding out I won a 48pk of them from Kaisercraft on Instagram, she asked me to make a few cards using them for the Wellington show.

I absolutely love the metallic pens, they are so shimmery and have great coverage. So decided to do some colouring with them:


So hard to capture the shimmer with my camera!! I decided to use these bear and lion stamps from Altenew 'Geometric Menagerie' and turn them into little note cards. I simply stamped them on white CS, coloured with the pens, fussy cut them out and added black pen to the edges. For a bit of interest I cut two panels of white CS slightly smaller than the card front, adhered them and popped the animals up on foam tape. Then all I had to do was stamp the sentiments in black. Nice and simple!!

I'm going to link these to the Taylored Expressions 'Share the Joy' Challenge #48 where their theme is:


Will also link to the Creative with Stamps Challenge # 5 where their theme is:


I have another card to show you using ALL of the pens (its rather colourful) but going to watch a few Instagram videos with Phoebe first. She always finds the funniest things to watch. If your looking for something funny you must have a look at Celeste Barber on Facebook or Instagram. She does her own versions of photos taken of celebrities, especially the Kardashians and shows what real women and Mum's look like. Hilarious!!!

Take care
Shona
 

Calling all Sistah's Blog Hop - August

Its the 17th of the month everybody so you know what that means....time to grab those boobs (gently please) and get checking!!


Its time to join us again for the Calling All Sistah's Monthly Blog Hop and you should have arrived here from the always spectacular Lydia's blog where I'm sure she will have wowed you with her creation. If you would like to start at the beginning of the hop, pop back to the CAS-ual Fridays Stamps blog to get the complete hop list. You have a chance to win one of 3 $15 gift vouchers, so the more comments you leave along the hop, the more chances you have!!

This blog hop was started to remind us to do self breast checks each month, as the sooner we discover there is a problem, the more chance you have of being able to overcome it. I have this link to a self breast check video if you haven't done it before. I didn't know what to do either and found this very helpful.

I really like the ribbon image for breast cancer and the ribbon die and stamp from CAS-ual Fridays is just gorgeous. I decided to try and create my own ribbon image using the ribbon die:

 
I die-cut the Ruffled Ribbon Die from a piece of vellum that was the same size as the card front. I taped it down over the card and then stamped the images using different shades of pink and red inks. I then removed the vellum and stamped part of the sentiment from the Calling All Sistah's  stamp set using black ink. I then die-cut the Sistah Fri Die from a dark pink paint chip and twice more from white CS. These were all glued together and then to the card front. I then added some sequins from Neat and Tangled.

To create the ribbon I used small stamps following stamp sets:

Christmas Sparkle (a little star stamp)
Sassy Smiles (small heart and flower stamps)
Loving Thoughts (small flower stamp)
Girlfriend (small flower stamp)


If you would like to purchase any of the Calling All Sistah's products or anything from CAS-ual Fridays Stamps, please don't forget to use my special code to save yourself some money. It might mean you can buy something extra with the savings!!!!


The next person in the blog hop is the incredible Lisa Harrolle of Embellish My World  and I'm sure she will have a fabulous project to share with you.

So grab a coffee, enjoy all the inspiration on the hop and then do your examination!!!

Take care
Shona


Tuesday, 16 August 2016

CAS-ual Fridays Stamps - Girl Friday card for August

Hi everybody and welcome to my CAS-ual Fridays Stamps 'Girl Friday' post for this month.


For my card today I decided to use one of my favourite CAS-ual Fridays flower stamps 'Mon Ami' and create almost like a peacock fan of watercolours:


I stamped and heat embossed the flowers in white on some water colour CS, and then used my Gansai Tambi water colour paints to gently colour each one. Once they were dry I used the co-ordinating 'Mon Ami Fleur Fri Dies die-cut to cut them out. I also die-cut a circle from white CS using the smaller circle die from the 'Ornament Tag Die' set and stamped the sentiment from the 'Truth Is' stamp set. 

To put this together I attached the first layer of flowers to the underside of the circle using foam tape and then did the same with the next layer, making sure there was foam everywhere so it would sit flat on the card front. To finish off I glued on a small gold star from Papervine.


I'm going to link this card to the Taylored Expressions 'Share the Joy' Challenge # 48 where they are looking for CAS designs.


If your inspired to purchase any of the CAS-ual Fridays Stamps products I used or any others, please don't forget to use my Girl Friday Code to save yourself a few dollars!!


Enjoy your week and  I'm looking forward to sharing another card with you next month!!

Take care
Shona

Monday, 15 August 2016

Waffle Flower Challenge - August

Hi everyone, I hope your week is starting off well and you have lots of crafting time to look forward too! I'm popping in with my inspiration card for the Waffle Flower Challenge for August!


This is the inspiration photo for this months challenge. The colours are so fresh and Summery and I love the beachy feel of the room. I decided to gather up all the colours and layer them together:


Lots of die-cutting for this one!! I used the largest circle from the Flower Circles Inverted Dies on a piece of wood veneer paper (from Papervine) but instead of separating the two pieces of the die-cut, I kept them together by adding washi tape to the back. I then grabbed some white CS and different coloured paint chips and die-cut them using the Lacy Flower Mats Dies. While I was die-cutting I also die-cut some more wood veneer paper with the Celebrate die, and twice more from white CS. 

The different layers were all adhered together and popped up on foam tape on the card front. All of the 'celebrate' die-cuts were glued together and then to the card. I then covered it with LOTS of Wink of Stella to give it some sparkle. The rest of the sentiment (from the Congrats stamp set) was stamped on a strip of white CS and adhered with foam tape and glue tape to keep it level. All that was left to do was add some clear sequins (from Pretty Pink Posh) and it was finished!!


You have until August 25th to link your project to the Waffle Flower Challenge  and the rest of the Design Team have some inspiration projects on the blog for you and there will be more next week. Can't wait to see what you come up with in the Gallery!!

Take care
Shona


Friday, 12 August 2016

Just Add Ink Challenge # 324

Happy Friday everyone and welcome to another challenge at Just Add Ink. We have a beautiful photo to inspire you this week:


I can just imagine the person taking this photo laying down in the grass, on a hot Summers day!! Such a pretty scene, just love the wood in the background and the fresh green of the grass. Its times like this I wish I had a grass die, so had to make a grassy hill instead:


Thank goodness for my tin of paint chips because I don't own any green CS at all. I used a curved-stitched die to shape the top and then cut the bottom and sides to the right size. The flowers were die-cut with white CS and also from a yellow paint chip, so I could inlay the yellow pieces and adhere at the back. I die-cut the wood veneer paper with a frame die and adhered it to the card front. The flowers were glued in place and the grass hill popped up on foam tape.

For the sentiment I die-cut the 'sunshine' from the same yellow paint chip and stamped the sentiment in black on a strip of white CS. These were glued into place and some clear sequins added as well.

The curved-stitched die, frame die and clear sequins are from Pretty Pink Posh. The flower dies are from Paper Smooches. The wood veneer paper is from Papervine. The 'sunshine' die is from Simon Says Stamp and the sentiment stamp from WPlus9 'Wishing You'. 

I'm going to link this to the Simon Says Stamp - Work It Wednesday Challenge - August where their theme is to use the August birthstone 'Peridot'.


I'm also going to link this to the Paper Smooches August Challenge where their theme is 'Friendship.


You have until next Wednesday 17th August to link your projects to the Just Add Ink challenge. The rest of the Design Team have lots of other ideas for you on the blog and I can't wait to see how your inspired by this photo in the Gallery.

Take care
Shona


Thursday, 11 August 2016

Reminder: Time Out Challenge # 63

Hi there, just popping in with a quick reminder about our current challenge at TIME OUT. Our theme is:


                          HOLIDAYS with the optional twist of no stamping
                                         (stamped sentiments allowed)


'No stamping' is totally optional but if you do decided to 'twist' you have the chance of winning a gift voucher from Uniko Studio, which would certainly encourage me to put my stamp sets away!!


I decided to go without stamping again and add another card to my Christmas collection, as I want to send out as many as possible this year. So out came some Christmas dies and patterned paper ('what?' I hear you say):


Yes, thats right, I used some patterned paper. Doesn't happen often and I have so many 6x6 paper pads to use, so its nice to give them an airing.

I cut a panel of white CS slightly smaller than the card front and used a hole punch to cut two small holes. I threaded some red/white twine through it and adhered it loosely at the back so it hung down a little (like the stockings were heavy with goodies). I stamped the sentiment (from Uniko Studio 'Rustic Christmas') in black and then grabbed my Cuttlebug.

I chose four different papers from Lawn Fawn 'Peace Joy Love' and die-cut stockings (using Waffle Flower 'Stockings' die). I also die-cut the fluffy part at the top of the stocking from white CS and glued it to the top of each one. To stick the stockings to the the twine I added double-sided tape to the back of each one at the top and pressed against the twine.

The panel was then popped up with lots of foam tape on the card front and I added lashing of Wink of Stella to the stocking tops. This was so much fun to make and nice to include paper and twine on a card for a change.

You have until Wednesday 17th August to link your projects to the TIME OUT challenge and the rest of the Design Team have some more ideas on the blog for you. Can't wait to see what you come up with without your stamps!!

Take care
Shona
 

Wednesday, 10 August 2016

Addicted to Stamps and More Challenge # 206

Happy Wednesday everyone, can't believe its already the middle of the week!! Its been freezing cold here of late with huge frosts in the mornings but the middle of the day is really hot, so its very confusing for the flowers, animals and us humans.


Its time for another 'Anything Goes' challenge at Addicted to Stamps and More. This one is always mega popular and the Gallery looks fantastic with so many different projects and designs.

Our Sponsor for this challenge is A Day for Daisies and they have a $12.00 gift voucher for the winner!!


I've still been playing around with the 'colouring on kraft with pencils' idea and even though I realised that my last ATSM card was this same technique, I just couldn't help making another one:


I've been using my Altenew stamps quite a bit lately. I found them a bit intimidating to start off with as I've seen so many incredible designs with them involved. However, the stamps are too lovely to be unused so I took a deep breath and grabbed them out. This is my third Altenew card in a row!!

I cut a panel of kraft CS and randomly stamped the flowers from Altenew 'Persian Motifs' in black ink. I then took my time colouring it all in using a pink and grey colour combo with my pencils. Once I was happy I then spent ages going around the images very slowly with my white gel pen. I have a very shaky hand so its not perfect but I just love the effect.

I cut the panel so it was smaller than the card front and then decided to do the unthinkable.....die-cut the middle of it!!! I was inspired by this card created by the incredible Kathy of The Daily Marker. I don't have any Altenew die-cuts so used this 'happy' die from Whimsy Stamps to die-cut the panel. I also die-cut two more from black and dark pink CS. I glued all the 'happy's' together, added a piece of white CS behind the die-cut negative and inlaid the 'happy' in place. 

Stamping on top of colouring or stamped images isn't something I do very often as I don't want to ruin everything with a smudged stamp but I took the plunge today and stamped the sentiment (from the same 'Persian Motifs' stamp set) in black. The panel was then popped up on foam tape over the card front and clear sequins from Pretty Pink Posh added for a bit of sparkle.

I have three challenges I would like to enter:

Altenew Inspiration Challenge - August 


Simon Says Stamp - Wednesday Challenge 


Uniko Studio Challenge #34 


You have until next Wednesday 17th August to link your projects to the Addicted to Stamps and More challenge. The rest of the Design Team have some gorgeous projects on the blog if you need any inspiration and I'm looking forward to seeing what you come up with in the Gallery!

Take care
Shona